A student asked a very interesting question, which I love to hear. This question is one that I’ve discussed here a lot but decided to do a blog on it because it’s not a one-word or short answer, but it is fairly simple once described. It’s also immensely effective and I’ve used it on normally shaped clients a lot to flatter their figures.
Here’s the question:
Hello Claire! I always devour your Friday posts! I was speaking with someone today about why their balance lines were so important on their dress silhouette and I mentioned what I had learned from you about raising the waistline a half an inch above the true waist. I had difficulty explaining why that works. Could you repeat that for me so I can pass it on to her?
This has to do with two parts of working with your silhouette proportion and line. One is the current fashion and how it developed in our mind’s eye. We go through a lot of changes in fashion, although we haven’t seen many in the last 30 years (which is a huge anomaly caused by something not having to do with fashion at all). But normally we have changes in fashion about every ten years, but I’m going to put an * on that which I’ll discuss later. The second is some sleight of hand that designers love to use.
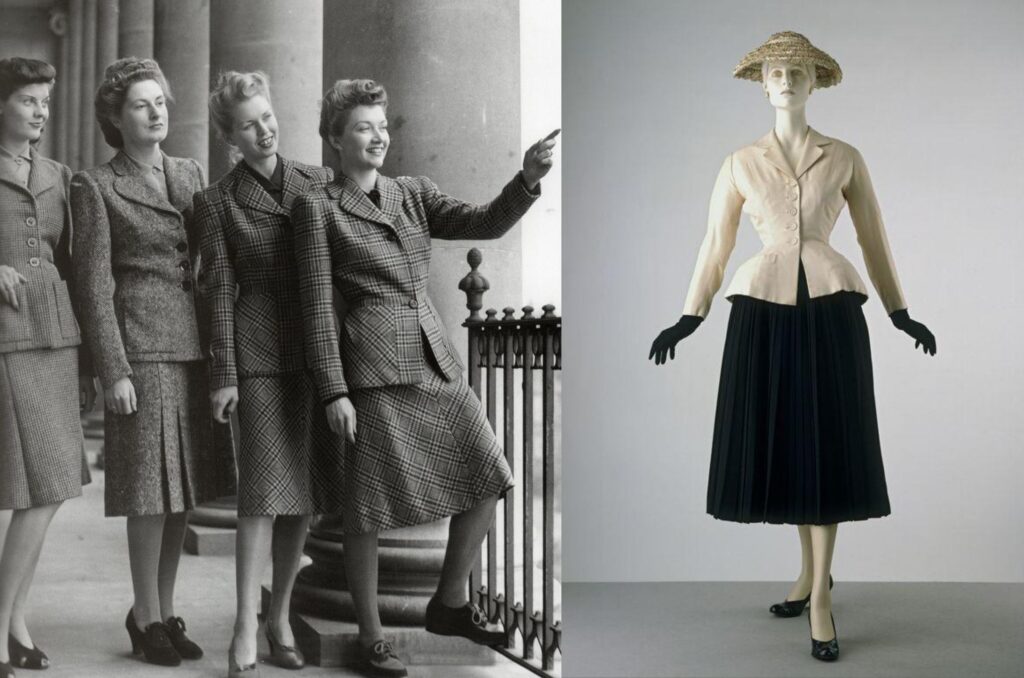
First, looking at the fashion of the times, it may be hard to consider but this look from Christian Dior (right) was so revolutionary and so new that it caused riots when it was first shown. From the drab, ration-favored look on the left, to the frivolous use of fabric on the right, it was a clear statement by Christian Dior. Here’s the history behind this, cause it’s important to know what was going on. The favored ration look was from Elsa Shaiperalli’s suit who made her garments so classic so as to show off an eccentric piece in the ensemble.
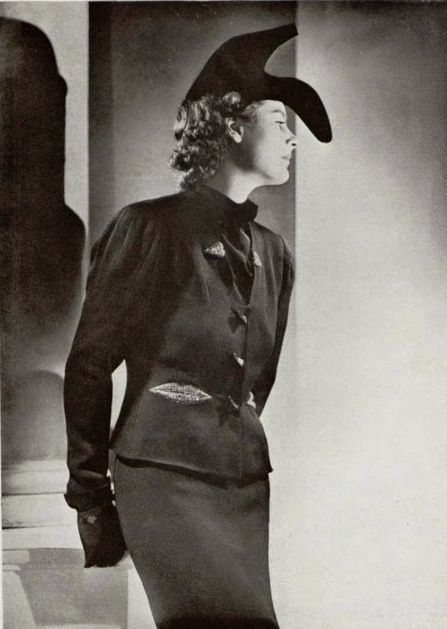
The hat is obviously the point of interest in this suit, but the suit had some great artistic qualities to it that made it fashionable. The suit was so classic, that it became a standard look from the late 1920s through the mid-1940s. This was the longest period without any major fashion change since the Grunge broke that record from 1992 to 2021 (and still going – almost 30 years with one fashion style).
The Dior “Bar Suit” was such a change from this, that it has its own place in history. After World War II, France, and specifically Paris was decimated. Even though Paris had been the height of fashion before the war, at the end of the war, there wasn’t much left of France. It had been an “occupied” country and had been sacked of all its art, finery, and valuables. Anything of value had been taken by the Nazis or redistributed through unscrupulous art dealers. Dior’s challenge was to not only change the fashion silhouette but hopefully to eventually bring back the high style that Paris had been famous for before the war. Dior knew that even though the country was bleak and horribly poor (rationing was immediately lifted after the war, but put back into place months later, as there was no economy of value, that rationing had to be continued for the population to exist.) But Dior knew that there was one thing that the Nazis didn’t take, and that was the skill, talent, and fine workmanship techniques that the fashion houses of Paris had employed for decades before. Using those skills he created a whole “new look” (as coined by the editor of Bazaar magazine), to not only bring a whole new silhouette but in one collection brought Paris fashion back from the dead.
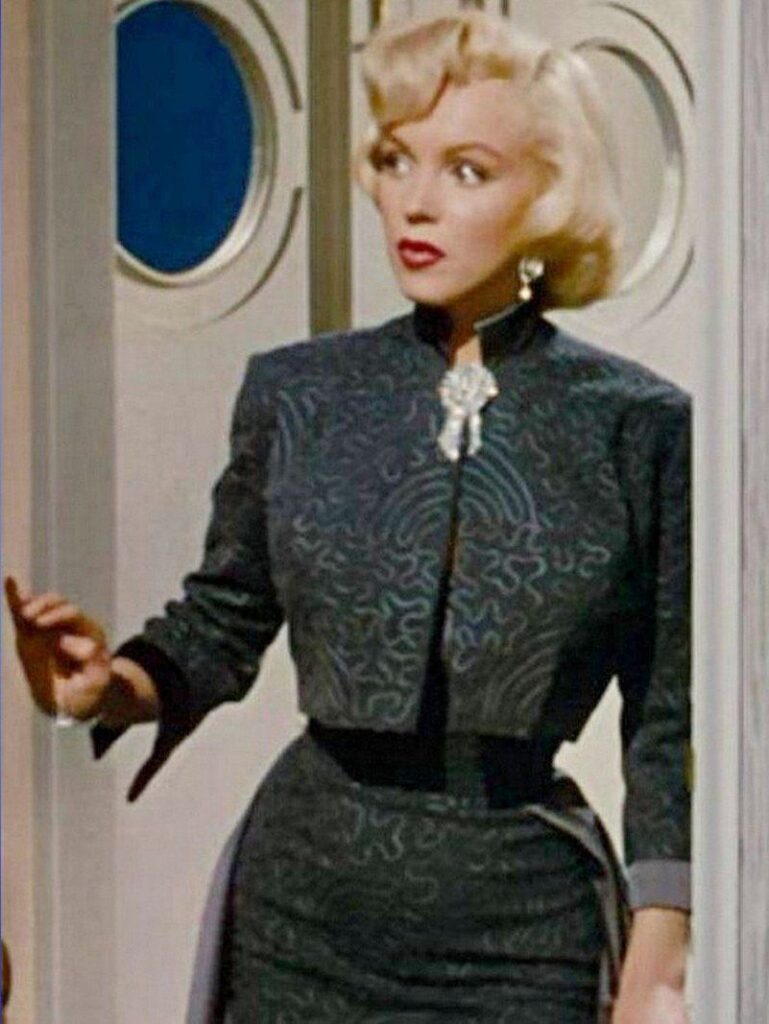
This is a fabulous video on the making of the suit, and what’s really important to note here is the change in silhouette. That change was from the straight, up-and-down, frugal, androgynous silhouette, to the extravagant, almost wasteful use of fabric of the bar suit. To make that change even more dramatic, the jacket’s hips have pads. This is one of the design techniques designers often use. Artists and designers know that providing high contrast is a great way to accentuate a focal point in their work. In this case, adding thickness and bulk to the hips makes the waist look even smaller. So the suit is fitted at the very smallest part of the waist (right above the hip), and then the exaggerated hip line makes the waist look even smaller. This silhouette was all about that small waist.
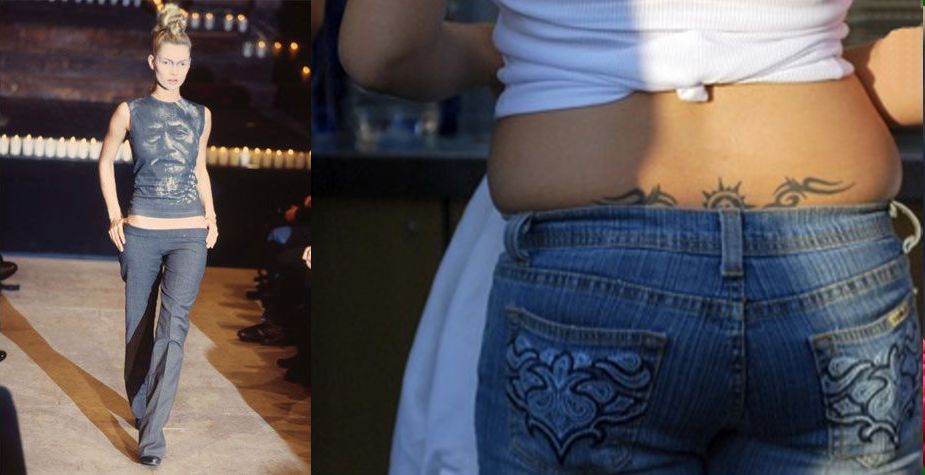
Fast forward a couple of decades and we have the Grunge look, and in 1995 Alexander McQueen introduced us to the bumster (left). It was a look to accentuate the androgyny and therefore the waist was not accentuated and the hip was. But as fashion moves into the mainstream, the style gets bastardized, and we end up with some looks that aren’t even close to the original look of the designer. This is another reason that fashion loves change so that these over-done looks don’t last so long. Unfortunately (and here’s that * I promised earlier), because the Grunge developed a business model that was so outrageously profitable, the fashion business and primarily the clothing manufacturing industry has not been able to give that up …until COVID. Nevertheless, our eyes are used to seeing the version on the left as high-fashion while the version on the right is to be avoided at all costs.
So we are beginning – a little – to turn to a different look. In my mind, this happened around 2011, when John Galliano showed his own show of the most beautiful dresses ever.
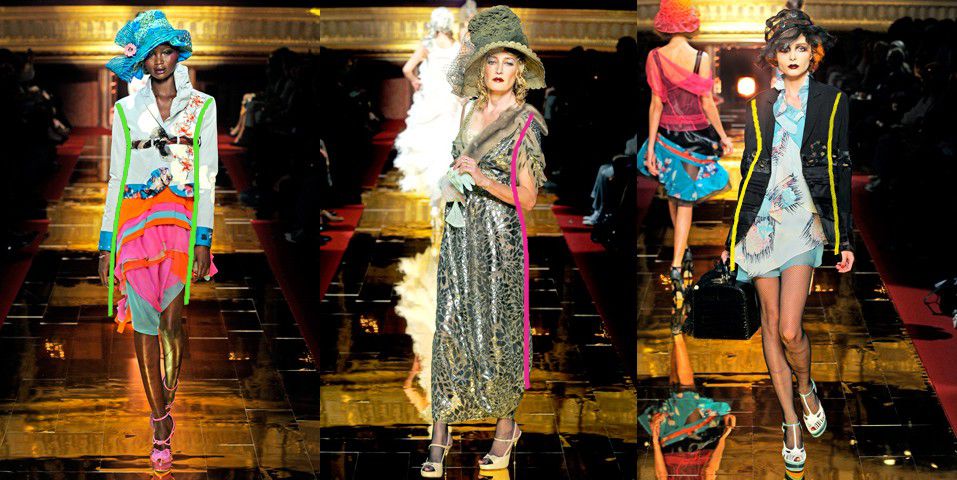
What’s worth noting here is that the waistline is raised, and not a lot, but a whole lot. Why? Because when you trend into another look, you want to make an exaggerated statement. Like the Bar suit that made the feminine silhouette almost artificial, the waist was so small. Here Galliano is raising the waist for a reason. First, there is a waist, and it’s the new focus. The old focus (McQueen’s bumster and others of the Grunge era), of the hips, is gone. Here is the focus on the waist. Not only that but frilly, happy, joyful fabrics and colors. I’ve outlined the silhouettes in all these outfits.
So why haven’t we moved more into this look? Well, we have, but it hasn’t been as dramatic as it should have been. For one thing, this fashion show was on the tail-end of his outburst that got him canned at the House of Dior. He was out and persona non grata in the fashion world. He’s since been in dry-out and some sort of therapy and is back designing again, but all this happening right around the time of this show, I think it didn’t get the press and excitement and attention it should have. Had Galliano remained at Dior this look would have been perpetrated by him and furthered. Because he had such a huge following, the look would have caught on. For more on the show, click here – it’s full of fabulous ideas.
But taking this apart, it’s fun to look at what he’s done.
- He’s raised the waist – opposite or at least different from the hip-accentuated Grunge look
- He’s made the looks ultra-feminine – different from the androgyny of the Grunge look
- He’s used bright, cheerful colors – different from the drabness of the Grunge look
- He’s used frills and ruffles – different from the post-apocalyptic look of the Grunge look
- He’s used a shaped and fitted silhouette – different from the ill-fitting looks of the Grunge look
He’s used the anti-thesis of what the Grunge look like, and part of that difference is focusing on the waist and not on the hip, but not so much focus on the waist that it creates a “muffin-top” look.
Even though this was a hugely popular silhouette in the 1950s, this cinched-in waist to over-exaggerate the fullness of the hips is now referred to as muffin top and is to be avoided at all costs, and Galliano does that in his collection. Even though Galliano’s beautiful styles haven’t caught on (yet), that doesn’t mean we can’t learn a lot from them. One of the lessons we can learn from Galliano is how he accentuates the waist but doesn’t create a muffin top look with the hips.
Here’s a great example of that. What happens when you have a huge differentiation from the bust to the waist to the hips? If you wear something that clings to the body, then you are going to show every ripple. However, if you keep the line smoother and modified (that means that it’s not so exaggerated in or out), then the waist looks fine and in particular the bust looks less large and the hips look smaller. This is the sleight-of-hand that the designers are using today to reduce the “muffin top” look of the hip but also keep focus and accentuation on the hip.
This isn’t that hard to do. There are some basic rules:
- Keep the garment waist a little above the real body waist line
- It’s not necessary to fit the waist snugly, particularly if that means an over-exaggerated silhouette. This is the balance and proportion part. This isn’t hard to do, you know it when you see it. Your eyes will tell you yeah, or nay.
- Make the waist at a height that will allow a gentler line from the waist to the hip. The more space you put between the waist line and the hip line, the more gentler the line will look and the more flattering the silhouette will look.
There’s something else to consider here too. This is mostly for Rectangular Shapes and Apple Shapes. Both of these shapes have little or no waist, but with some gentle sleight-of-hand, we can make it look like there’s a waist. By letting the underbust be fitted slightly, not a lot, then allowing the garment to hang straight after that, that under-bust fit can give the illusion of a waist.
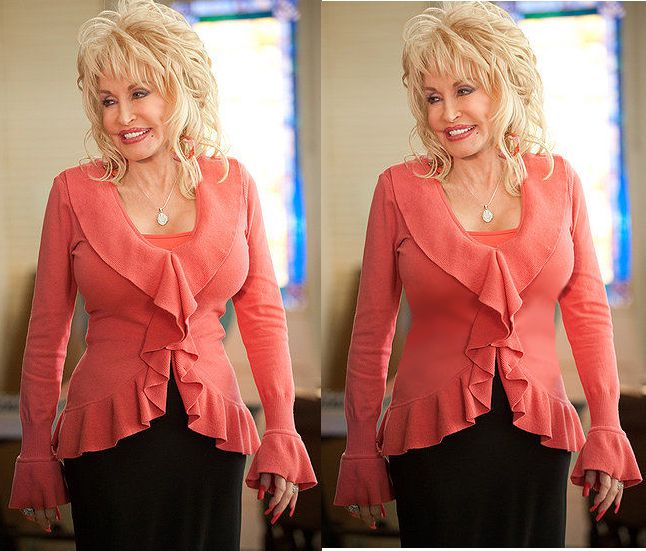
Most of all, it’s that slightly raised waist that causes Dolly’s sweater to look so much nicer. The sweater on the right is morphed, but her hips and bust are the same. Her waist is a little higher and therefore a little larger reducing the contrast in the smallness of the waist and the largeness of the bust and hips. It’s a much more flattering, and classic look which is what most of us want. Now Dolly is a star, and as such, she dresses outrageously because that is what carries off on stage. The more glitzy and glittery a person is on stage the better. For those of us who aren’t on stage, that look is not good for a street look, so we won’t be doing that kind of dramatic contrast in our silhouette.
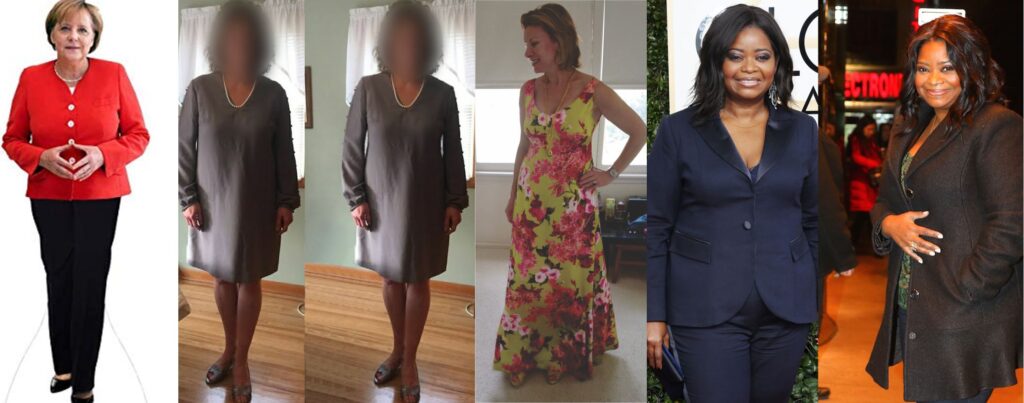
These are all excellent examples of a raised waistline in practice. From left to right, Angela Merkel who has to look responsible yet modern in a beautifully fitted, raised-waistline jacket; a client in a classic dress and with proper shoulder placement and a nip in below the bust, voila – a great looking outfit; a client who was about 2 weeks after having a baby but wanted to look nice for a formal event; and one of my favs, Olivia Spencer in two jackets beautifully fitted, with great shoulder placement, nipped in below the bust and raised waistline to give the illusion of a waist that all makes for a very pleasing silhouette.
Broken down in as few words as possible, the reason the raised waist works is that it reduces the high contrast in proportion and size, it lengthens the distance between the “illusion” waist and the hip area, making the hips look more in proportion to the waist and therefore smaller. Even if you have a muffin-top figure, the raised waistline that flows at a more gentle line will hide that muffin-top. This technique is downright amazing when you see it on others and when you see it on yourself.
The question might come that if you raise the waistline to give a more gentle slope to the silhouette from the waist to the hip, then why can’t you lower it, to give that more gentle slope? For a couple of reasons. The first is that we’ve had the accentuation at the hip now for about 30 years. Change is needed and change makes your wardrobe feel fresh and new. Another is that having the waist lowered, really doesn’t accomplish that more feminine silhouette, which is also new. No more straight-up-and-down. There’s a little dip at the waist and it looks fresh and modern.
One more caveat here, and that is the location of your real waist. Your real waist is not at your belly button. You may think so because it’s been there for 30 years (that’s the timeline of one generation which means there has been a generation that has known only one fashion style all their life). Your waistline is above your hip bone on the side of your body, and below the lowest rib bone. That’s, at the most, about a two-inch space, and that does not fall on your belly button. Now you may like your clothes to fit at your belly button, and that’s OK if that’s what you like, but your patterns should all be marked with the location of your true waist. This makes for altering, designing (particularly when you want it raised to have a newer silhouette look), and fitting so much easier and more exact.
I always look forward to your questions and ideas about the information you want to know about fitting, sewing techniques, and flattering your shape and size. That sounds like a tall order, but it’s actually not. Every week I discuss these topics and other related topics about how to look better, feel better (and comfortable), and project the image you want others to have of you — even if it changes a lot, you can still have comfort, style and flattery in your clothes!
Thank you Claire, beautifully, beautifully explained and I absolutely love the snippets of history you include. Now of course the next question is probably going to be in the second photo of your client, exactly how did you nip it in under the bust? Did you use a dart or did you just pull the side seams in a bit?
Chris – on the client’s dress there are a couple of things that make this work. Listed:
So now a little tiny nip in the side seam (the FBA is doing most of the nipping believe it or not) and poof – magically this lady has an elegant dress for a cool summer wedding. What started out as a frumpy dress, now looks like a miracle find at the store. That’s how subtle and magical that FBA is. The non-sewing folks don’t have a clue about what’s giving that dress the small little nip at the “waist” and yet it works beautifully. I like it cause it’s so subtle and so effective.
So two things – measure your pattern on your shoulder and THAT’S the size you cut and then do as many FBAs as you need. I don’t like to make the FBA more than 1″ per side per dart. IOW, I don’t like a dart that competes with Madonna’s Blond Ambition tour. You don’t want a “pointy” look, but a soft curved, natural look, that may be more than one FBA, but that’s OK.
Fabulous post! Thank you.
Abbey
WELL, thank you for this!
I learned to sew at age 5 and was so happy as I grew into a rather tall, 5’9″, teenager that I could sew becasue all one piece articles of clothing had a waist that was often at least an inch above my natural waist that it felt uncomfortable. That was when I was an equivalent to today’s size 8. Flat tummy, small waist (24″) no other fitting problems.
Fast forward to age 75 and I’m so thankful I learned only 18 yrs ago, how to really fit! I’m only 5’7″ waist 33″ and a size 12 retail. Of course, retail really doesn’t FIT. Thank you for emphasizing how important to a pleasing silhouette fit is and as sewist how we can make agustmaent stories making our fit more attractive.
You lucky dog that you learned so early, and yeah, that’s what I run into today – I’m short, and short-waisted and sway back. So I have to make all sorts of alterations if I want an RTW garment to fit. But as YOU know – everyone has to make alterations to RTW because RTW only fits about 10% (at most) of the population, and then we’re told that “it’s okay” to have something weird, ill-fitting, out of whack and too-tight or too-loose. It’s not, that’s just the propaganda from the RTW industry so they don’t have to fit most of the consumers. Grrrr! You’re lucky that you don’t believe that!!!! 😉
im 6′ tall and my belly button is 3 in higher than my hip bone. do I raise my waistline the 3 inches?
Nancy – It’s pretty common these days to not be sure where our waist really is. For almost 30 years we have had a fashion “style” that’s the same. That style is the “bumster” that Alexander McQueen did in 1995 and that has imprinted in our minds as the “official” location of our waist. With nothing to counteract or oppose that, people actually believe their waist is at their belly button.
The actual location of the waist is lower than your lowest ribs, and higher than the highest point of your hip bone. If your belly button is higher than that highest point of your hip bones , you’re right….you probably have a waist that does fall on your belly button. This is very rare though, as most have their belly button at about 1″ to 2″ below that highest tip of the hip bone.
Hope that helps!
I just reread this blog and wonder why you don’t recommend having someone bend to the side to find their actual waist? Even if someone has a “no waist” type body, these bend will give a good indication of where a wait is.
I like that, but the problem is that so many have been drilled into thinking that their waist is where their hipster pants hit. They forget that they are “hip”ster pants and they really don’t hit and aren’t supposed to hit at the waist. You’re right, bending sideways is a great way to tell, but if they deny even the most common guidelines then me going on and on is not really instructing at that point. The best I can do is to remind them that if their rise is wrong, (which it usually is if they’re measuring their waist at their hip), then the solution is to remember that their hips are actually not their waist – and THEN they learn. Sometimes you have to allow folks to make a mistake and THEN they listen. But you’re right about bending at the waist.
wonderful post!! can’t wait to apply these techniques !!
Actually this has become much more fashionable as we move into a more moderated look. The look of the series, “Succession” and other series that exemplify a more classic look, shows how line and style and balance is vital in that look. The wealthy really do know how to dress in a stylish, yet very enduring look. They practice a look that does not bring attention to them, but to those in the know, reeks of expensive and quality construction. The consumer can only drool from afar, but we sewists can dress right along side the wealthy and no one, including the wealthy will know the difference.